Bean Blog

How to export a .QIF file from your bank - Giles & Liew Chartered Accountants

How to Download a .Qif File

February 28, 2020

How to Download a .QIF file so that you can send us your electronic bank statements.

Part of going paperless means that data is now exchanged in different ways and formats.  The easiest way for us to receive your bank transaction information is directly into an online accounting system such as MYOB Essentials.  When this is set up for the first time, we may also request that you email us a QIF file for a specific date range, this will be a one-off request.

We require the QIF file because most of the banks will only supply the bank transactions from the date that the systems are set up.  In order for us to have a complete financial year of data, we need to get an electronic copy of the bank transactions from the start of your financial year (usually 1 April) through to the start date of the banking transactions in your accounting system.

MYOB specifically requires a QIF file.  Please be aware that this is not the same as a CSV, it will not be able to be opened.  The reason we ask for this type of file is that it contains a lot more data and integrates better with the software.

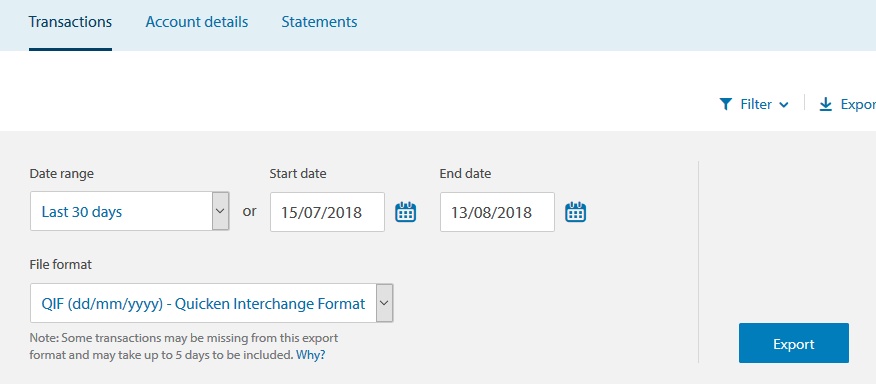
The process for getting a QIF file is fairly straight forward but is slightly different depending on which bank you are with.  We have provided detailed instructions below for each major bank in New Zealand.  If you require further assistance to complete this, please don’t hesitate to contact us.

It is also recommended that a PDF of the Bank Statement that clearly shows the balance as at the end date of the QIF Data you are sending is also sent to us. For example, if you are sending a QIF from 01 April 2019 to 27 May 2019, also include the May Statement which shows what the correct balance is as at 27 May 2019. This step acts as a check to ensure that the data has correctly been transferred to the software.

If you have chosen to use XERO, we may request an OFX file, you can follow these same instructions and just choose OFX as the file format instead of QIF.

Once you have downloaded the files please email them back to us so that we can get the accounting software set up correctly with a full year of transaction data.  If you have any questions or concerns please get in touch, we are happy to help.

To jump to your particular bank instructions, please click on the appropriate heading below:

  1. How to Download a .Qif file for ANZ Bank.
  2. How to Download a .Qif file for ASB Bank.
  3. How to Download a .Qif file for BNZ Bank.
  4. How to Download a .Qif file for Heartland Bank.
  5. How to Download a .Qif file for Kiwibank.
  6. How to Download a .Qif file for Westpac Bank.

ANZ

  1. Log in to ANZ Internet Banking.
  2. Select the Bank Account you want data for. If you are downloading multiple QIFS you will have to do this one at a time.
  3. Click on the “Export” button.
  4. How to Export a QIF file from ANZ Bank
  5. Select the “Start” and “End” dates. Double-check that these are correct.
  6. The most important step: for “File Format”, make sure you select “QIF (dd/mm/yyyy) – Quicken Interchange Format”.
  7. The data is ready to be exported, so simply click the “Export” button.
  8. Your web browser will ask if you wish to “Open” or “Save” the file.
  9. Save the file to your desktop and attach this file to an email to your accountant.

More information from ANZ Bank.

ASB

  1. Log in to ASB Internet Banking.
  2. You should see the “Balances” page by default. Click on the name of the bank account you wish to export data from (e.g. Streamline).
  3. In the box above your transactions, enter the “From” and “To” dates for the period you want to include.
  4. From the “Export as” dropdown menu, select the “QIF – Quicken” format option.
  5. How to export a .Qif File from ASB Bank
  6. Your web browser may ask you if you want to “Open” or “Save” the file.
  7. Save the file to your desktop and attach this file to an email to your accountant.

More information from ASB Bank.

BNZ

  1. Log in to BNZ Internet Banking
  2. Click on the name of the bank account you wish to export data from
  3. Click on “More” at the top of the screen and then “Export transactions”
  4. In the popup, select the “QIF” file type by clicking the dropdown arrow beside “Format”
  5. Select the time period by clicking the dropdown arrow beside “Export”, Click “Export”
  6. Your web browser may ask you if you want to “Open” or “Save” the file.
  7. Save the file to your desktop and attach this file to an email to your accountant.

More information from BNZ Bank.

Heartland

  1. Log in to Heartland Internet Banking
  2. Click on “Accounts”
  3. From the “Account Activity Screen”, you can download your transactions
  4. In the “File Format” box, select the “QIF” file type.
  5. How to export a .QIF file from Heartland Bank
  6. Click “Download”
  7. Your web browser may ask you if you want to “Open” or “Save” the file.
  8. Save the file to your desktop and attach this file to an email to your accountant.

Kiwibank

  1. Log in to Kiwibank Internet Banking
  2. You should see the “Accounts” page by default. Click on the name of the bank account you wish to export data from (e.g. Business Cheque)
  3. In the “Show transactions from” box near the top, enter the “From” and “To” dates for the period you want to include
  4. Click the “Search/export options” link, near the lower-right of the “To” box.
  5. How to export a .QIF from Kiwibank New Zealand
  6. From the “Export” dropdown menu, select the “Xero / MYOB / Quicken (QIF)” format option.
  7. How to export a .QIF from Kiwibank
  8. Click “Export”
  9. Your web browser may ask you if you want to “Open” or “Save” the file.
  10. Save the file to your desktop and attach this file to an email to your accountant.

Westpac

  1. Log on to Westpac Internet Banking.
  2. You should see the “Accounts” page by default, but if not, click on “Accounts”.
  3. Click on the name of the bank account you wish to export data from.
  4. How to export a .QIF from Westpac bank New Zealand
  5. Select “Export Transactions”.
  6. How to Export a .QIF from Westpac Bank
  7. Enter the “From” and “To” dates for the period you want to include
  8. For “Format”, select “QIF dd/mm/yyyy”.
  9. Click “Export”.
  10. How to export a .QIF from Westpac Bank NZ
  11. Your web browser may ask you if you want to “Open” or “Save” the file.
  12. Save the file to your desktop and attach this file to an email to your accountant.

More information from Westpac Bank.

About Prashna Mclean

Prashna McLean Accountant - Giles & Liew Chartered AccountantsPrashna provides accounting, systems advisory and business advisory services to clients. She is passionate about creating internal system efficiencies and has a natural fascination with the analytical side of accounting. Prashna’s interest in the economics surrounding accounting in today’s changing business landscape translates into a propensity to deep-dive into financial statement analysis with a view to assisting clients to make improvements in business performance.

sign up for bean blog updates

Subscribe toThe Bean Blog

Subscribe to
The Bean Blog

Subscribe to get tips on how to grow your small business

You have Successfully Subscribed!